
Table of Contents
This post may contain affiliate links to things like tours, hotels, Amazon associates and products. These help me earn a small commission at no additional charge to you.
I often get asked how I take solo travel photos and to be honest, there’s no one sole method.
Of the many pros and cons of travelling solo, the struggle to get in your own photos is an undeniable con. We’ve got no Instagram significant other or personal photographer following us around! For every effortlessly casual girl wandering across your Insta feed, you can guarantee a fair bit of thought went into how to get the shot.
In this blog, I’m going to share my solo travel tips to help you take beautiful solo travel photos. It’s an important topic: who would want to take a bold and brave trip around the globe only to come back with no evidence of them there?
Taking photos of yourself is a great skill to have. If you want to take photos of yourself and a partner or bestie at a later date, the principles are the same.
Knowing how to take photos when travelling alone is a handy skill to have but even more important if you’re hoping to start a travel blog. You won’t find many bloggers who never post photos of themselves!
How to take solo travel photos
These are a few main ways I take solo travel photos. I’ve implemented these 14 tried-and-tested methods during my solo travels around India, Bali, Vietnam, Mexico, South Africa and Romania. In this guide, I’ll share my top solo travel photography tips for safety and pose suggestions.

Read next: 30 best places to travel alone
1. Self-timer mode with a smartphone
Ah, my old friend. Even old smartphones have a self-time mode. I have an iPhone 6 (potentially fake) that I bought for £100 three years ago when I was robbed while travelling solo in Vietnam and even that has a self-timer. These are really easy to use.
You just set the timer for 3 or 10 seconds and do your thing. The only thing to worry about is how to position your phone while you go off to pose?
Smartphone and self-timer method #1 – prop your phone up
This is probably the easiest and most basic way to take pictures when you travel alone. You need no kit, just your phone. Despite what you might think, you can actually get really decent photos with this method, especially after a little editing or straightening if the photo is at an angle.
Good things to prop your phone against include your bag, a water bottle, a chair or a wall. There are so many ways to get creative. You should see the random piles I’ve made before comprising bottles, bags, sunglasses, suncream tubes and the like. Passersby must think I’m mad but hey, if they’re not offering to help, who has time for their judgement? Not I.
Smartphone and self-timer method #2 – phone stand
Purchase a handy phone stand and you can eradicate the need for makeshift stands as you prop your phone up. Securing it with a proper stand also means it’s less likely to fall or get damaged during your solo photoshoot. Use a phone tripod with Bluetooth remote (that doubles into a selfie stick).

2. Self-timer mode with a camera
Travelling with a better-quality camera may mean better travel photos, depending on your camera and how you use it. I use the Sony DSC-HX350 Digital Compact Bridge Camera which I think is one of the most affordable options for a camera with such a good zoom.
But regardless of the type of camera you have, you can use it to take amazing photos of yourself while travelling solo.
So, how to do it? The premise is more or less the same as with a smartphone; in fact, I would say it’s easier as cameras usually have a flat base so sit more easily on a step or wall.
The only thing to be aware of is that DSLR cameras are usually more valuable than smartphones and also more obvious so you’ll want to be slightly more careful. Later, I’ll run through a few safety tips for solo female travellers taking photos alone.
3. Remote trigger controlled with your phone
One of the hardest parts of taking pictures on a solo trip? Only having a few seconds to run and get into shot after setting your self-timer.
I remember travelling solo in South Africa where there was a luxurious outdoor bath overlooking an amazing rainforest canopy. Setting my timer to 10 seconds then scrambling over craggy rocks to jump in the water, all in a swimming costume with a vertical drop a few metres ahead… Well, let’s say it was pretty stressful!

Many cameras these days can be connected to your smartphone via an app which you can control from your phone screen. My Sony camera connects to the Image Edge Mobile app. Here you can connect your camera, automatically send over photos and better yet, take photos without touching your camera.
When taking solo travel photos, you can get in position, perfect your pose and even check what the image is going to look like on your phone screen before pressing the shutter.
4. Use a tripod (my chosen option)
Using a tripod is my number one way to take pictures as a solo traveller. I can’t believe it took me so long to make this upgrade.
When I first started travelling and blogging, I only did so as a hobby and it didn’t seem worth it to carry such a large item when I only had a backpack to store all my worldly possessions. I begun with a selfie stick or propping my phone up and upgraded to a GorillaPod (more about these next) but found they didn’t quite meet my needs as I got more professional about blogging and photography.
If you’re like me and serious about your shots, I would really recommend a tripod.
What’s the best tripod for solo travel photos?
I’ve now tried two and would recommend investing when it comes to tripods. The first I bought was cheap but it was also bulky and not overly sturdy. It was a test item for me because I didn’t know whether travelling with a tripod was going to be too much for me.
As it happened, I don’t mind backpacking with a tripod and my photos are well worth the extra weight.
Nowadays, I use the Manfrotto Compact Action Aluminium Tripod. This is a great tripod! For $60, it’s lasted two years without showing any signs of wear. I predict it will last years more.
I particularly like the flexy ball head that lets me move my camera around to get the best angle. It also easily shifts my camera to portrait position which I prefer to landscape for Insta shots. This tripod is ideal for DSLRs, mirrorless and compact cameras and is suitable for photography beginners. It also comes in a bag that you can easily throw over your shoulder.

5. GorillaPod
Is the idea of carrying a tripod too daunting in terms of weight and space? Fair enough. If you simply want to take photos of yourself, don’t stress too much over kit. There’s a much, much smaller and lighter option that I’m a big fan of.
GorillaPods are ingenious little items that weigh less than even your smartphone. These bendy devices are way better than camera stands because of their flexibility.
You screw them into your tripod bush (the screwy bit at the base of your camera) and then manipulate the bendy legs to whatever position you want. You can bend and fasten them around railings, tree branches, lamp posts… Literally anything!
I own a tripod and a GorillaPod. If I’m off on a hike or busy city day without the guarantee of being able to set up my tripod, I throw my GorillaPod in my bag instead. They weigh almost nothing and take up no space.
Downsides of a GorillaPod: There are no downsides in terms of design or functionality. But since GorillaPods have short legs and therefore lack height, it means you often have to find something eye level to secure them to. If there’s nothing of that level around, they don’t always work. You can usually get creative and find a similar shot, but sometimes you want that shot and can’t recreate the height a tripod would give.
Top tip: If you’re using a camera larger than a small compact, you’ll need to use a GorillaPod that can take its weight. For my camera, I use a 1kg GorillaPod. Heavy DSLRs may need a GorillaPod that can take a greater weight.
6. Ask a stranger
How to take great photos of yourself with no kit whatsoever? Sometimes all else fails: there’s nowhere to set up your tripod or you’re visiting an attraction where they’re not allowed. Sometimes it’s just too busy and crowded to set one up. This is when asking a person to help is the quickest and easiest option.
To start, you might feel awkward asking strangers to help take your photo. You’ll hopefully shake this feeling off quickly. Just think, in five years’ time, what will bother you more: the fact that you took five seconds out of a stranger’s day or the fact you don’t have photo memories from your solo travels? I’m sure it will be the latter.
Now the one thing to overcome: strangers can take terrible photos. I could scream thinking about all the times I’ve lined up thoughtful shots for strangers who’ve then taken a rubbish one of me with the main temple cropped out…
How to get strangers to take nice photos of you while travelling solo
Tip 1: Approach the right person, preferably someone with a decent camera themselves. Not because they’ll use it, but because they’ll know how to use yours.
If no one around has a camera, go for a younger person because chances are they’ll have a better grasp over technology. Also, teenage and twenty-something girls usually know what shots are most flattering – just sayin’.
Tip 2: Line it up for them. Rather than handing them your camera and letting them use their judgement, I would suggest holding the camera in place then telling them what you want i.e. ‘if you could just get me on the left side that would be great!’.
Tip 3: Chat! Science proves if people like you, they’ll work harder when they do you a favour. I just made that fact up but it’s definitely true. This photo below was taken at the City Palace in Jaipur by a guy I’d just bonded with over my trip to his home country. He ended up taking a great photo which I suspect might have been because he felt more inclined to help me out.

7. Take a tour
Some of my favourite solo travel photos have been taken by tour guides. I find that guides are usually great photographers, probably because they take photos of their guests so often. Since they’re also ‘at work’, they make more of an effort than passing strangers. The fact you might leave a tip at the end probably doesn’t hurt either.
Taking a tour is also a great way to meet people while travelling solo who may take your photo. If a multi-week organised tour isn’t your thing, why not consider a day tour or even better, a free walking tour? I’ve done these in cities all around the world and love them.
8. Collab with other solo travellers
If taking photos of yourself when travelling solo seems like a lot of work, why not recruit other solo travellers to help? This way you’re not really asking a favour because they’re probably in the same boat. It can be mutually beneficial as you can take photos of them, too.
If there are no other solo travellers you’ve bonded with IRL, use the internet to your advantage. I love the Facebook group Girls Love Travel and often see girls mentioning that they’re in x location looking for travel buddies. If you post saying you’re looking for help with solo travel photography, I bet you’ll connect with someone nearby who feels the same.

9. Photograph different parts of your body
Sometimes solo travel photography is about getting some human element in the photo even if that’s not your face. Why not take photos of your feet with different backgrounds: beaches, canopy walkways, over vertical drops while hiking. You could even make a photo series over it. After all, you’re still taking photos of yourself travelling!
You could also take photos of yourself holding a mascot item, hot drink or item of food. If you’re starting a travel blog, you’ll still be putting yourself in the frame and you can even do so creatively to tell a story. Maybe you’re a tea or coffee fanatic and try the local drinks in different countries, ideally with great views?
Here’s one of me drinking hot lemon honey tea in India last year. At the time, I was incredibly sick and my face was as white as a sheet so this type of shot actually worked much better for me.

How to take solo travel selfies
When we hear the word ‘selfie’ our minds often jump to overly edited, posed shots that probably have little to do with travel. This doesn’t have to be the case.
There are plenty of bloggers and solo travellers who don’t set their camera up far away. Instead, they stay close to the camera which is a great way to show your face and build more of a personal rapport with your audience. If you’re a blogger, I recommend having a few of these to break up all the far-away shots. If you’re hoping to take photos of yourself, why not try…
10. Arm selfies
Just going back to basics with an old classic here. Taking photos on a solo trip can sometimes be as simple as a quick selfie, especially if it’s only going to family and friends. Photos don’t have to include cheesy smiles either; you can use them to capture your ‘staring out at the view’ pictures perfectly.
11. The selfie stick
Attach your phone to a stick in order to get more length and include your body in the shot. You can set up a self-timer or purchase a Bluetooth selfie stick that has a built-in Bluetooth button at the bottom to take your photo with. For best value, get a selfie stick that doubles into a camera stand.
Top tip: Taking a stranger’s eye out won’t win you any friends! Be mindful when you take pictures of yourself travelling alone especially if you’re any kind of stick.
12. The GoPro
An extra benefit of a GoPro is that they take wide-angled photos which means it’s easy to get your whole body and the scenery in the shot. Since GoPros are tightly fastened and waterproof, you can take solo travel selfies underwater, in the air, on the back of a moped… The world is your solo travel backdrop! I use the HERO8 Black.
13. The GoPro screengrab
Another of my favourite techniques for taking solo travel photos is to simply make short videos on my GoPro and screengrab them later. It would be too blurry to do this with your smartphone but GoPros let you break down the footage to milliseconds and export them as high-res image files.
GoPros let you change the shooting mode to ‘photo’ rather than ‘video’ but I rarely do this. If you smile while making a short video, you can pick the angle and moment where you look best. I tend to move the camera as I film to change up the background and get different angles, giving me some options for screengrabbing later.

Confidence tips for solo photography
I get it. You feel self-conscious when people are watching you take solo travel photos but you also feel self-conscious asking someone to help.
Especially as a woman travelling solo, I hate feeling watched especially by men (even though it’s probably harmless). Also as a young person, you worry people will stereotype you as all about the ‘gram or not appreciating the moment.
My personal pet peeve is when I’m taking pictures on a solo trip and someone wants to walk between me and my camera but instead of quickly nipping through, they wait for me to finish. I know they’re trying to be nice but I can’t think of anything worse than doing a full-on photoshoot with people waiting and watching when it would take less than a second for them to zip past and be gone!
To feel less self-conscious…
Get off the tourist track
Take your photos in remote locations like fields and backstreets rather than at Bangkok Grand Palace, for example.

Go early
Arrive somewhere outside of peak hours and there will be fewer people around. This is good for solo travel photos with a tripod or self-timer and not worrying about the reactions of others or feeling you have an ‘audience’.
Practise
Like anything, such as eating alone in a restaurant and not worrying what people think, it gets easier with experience and practice. Sometimes you have to fake it ’til you make it and ignore passersby until you genuinely stop worrying.
Ask the right person
This point isn’t necessarily about asking people who will take good photos, but identifying people you feel comfortable asking. I’d feel most comfortable asking a girl my age to take my photo as I think they’d understand my plight and relate. I probably wouldn’t ask a busy-looking family with kids or a couple on a date as I would feel I was inconveniencing them.
Pose suggestions for solo travel photography
Now that you have 14 different ideas for taking solo travel photos, you just need to consider what to do in the photos. This depends whether you want smiley shots for your photo memories or more creative photos for social media. Even if you’re a blogger, I’d still recommend taking some normal travel snaps for future memories.
These are a few of my favourite pose ideas for solo travel photography:
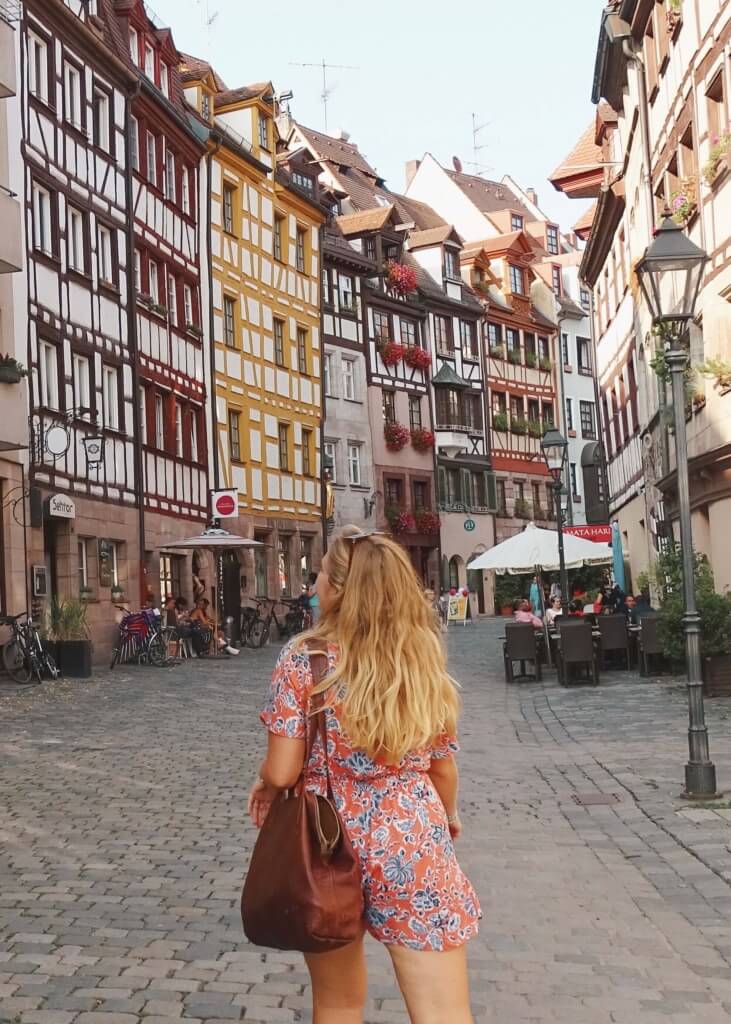
The ‘walking away’ shot
I’ll be honest, sometimes these solo travel photos come as a result of a short self-timer when I haven’t reached my ideal pose spot yet! But overall, you see a lot of shots on social media of someone walking towards an attraction or into a beautiful landscape. These show the person being part of the travel destination rather than simply using it as a backdrop.
Pros: You don’t have to do your makeup… Not that you ever HAVE to anyway!
Cons: You’re not looking at your unattended camera which could be a safety concern.

The ‘back of the head’ shot
These are similar to the ‘walking away’ shot but the subject is usually closer to the camera. Rather than seeing the solo traveller amongst the landscape, these shots show them admiring and drinking it in.
Walking across the shot
This is another favourite solo travel photo pose of mine. For these photos, I take photos of myself sideways as I walk past a scene. I find these work better against something straight like a row of houses rather than a beautiful travel landscape which is best ‘walked into’.

Facing the camera but look away
This is one I do all the time. These photos are more personal because they feature you front-on but you don’t need to be grinning at the camera in a cheesy way. By looking up or sideways at whatever’s in the shot, you’re showing the audience that you’re engaging with it, subsequently building a connection between yourself and the location.
You don’t need to be craning your neck: just be looking a few degrees away from the camera.

What to do with your arm and legs? I never used to know what to do with my limbs in photos. While walking, I would suggest leaning on one of your legs or having it slightly forward, as if you’re about to take a step. This looks more natural as if you’re involved in the scene around you.
When it comes to your arms, don’t leave them dangling. For walking away shots you can leave them in front of you. For shots of you walking towards the camera, have them ‘in movement’ or one flying behind you. If you’re standing still, keep your shoulders and arms tensed rather than loose. You could also gently use one to lean against a railing, rock or something else in the shot (but only if it’s safe and respectful to do so).
Below I’ve gone for the ‘in motion’ movement.

Personal tip – I usually take my hair down for photos as I think it looks more free and natural. In hot weather, this means quickly pulling it down from whatever unflattering bun is going on that day. After a few seconds taking a photo, it goes straight back up!
Props and accessories
This all depends how serious you are about taking photos of yourself travelling alone. Personally, I’m not serious enough to plan my outfits, although when I accidentally match with my surroundings I do think ‘I should do this more often!’.
Serious photographers will advise you to do Instagram research in advance to see the main colours in the place you’re going, then wearing an outfit that enhances them. For example, don’t wear blue beside the sea or yellow on the beach or you’ll blend right in!

Solo travel photography tip: Have an accessory like a headband or scarf in your bag and throw it on for the photo. Especially if you’re wearing a muted colour and it’s a grey day, this could be the colour pop that turns it from a boring photo into a fun photo.
Safety tips for taking photos travelling solo
I wanted to quickly cover this topic because people often say ‘Aren’t you worried about someone stealing your camera while you’re away from it?’. The truthful answer is no, not really.
I’m rarely away from my camera for more than a few seconds at a time. In busy tourist places, there would be a lot of witnesses. In more remote places, someone would be hard-pushed to come that close to me and my camera set-up without me noticing. However here are a few safety tips when taking photos travelling solo.
Keep your bag or valuables on you
This is an irritating part of solo travel photography. As you’ll notice online, most bloggers aren’t carrying their backpacks in the photos. So where are they?
One option is to head out on a small photoshoot and leave your day bag at the hotel. If your camera is your only valuable on you, you’ll feel better about leaving your stuff for a few seconds.
For solo travelling generally, I always suggest bringing a small crossbody bag or bum bag with secure zip out for the day as well as your main bag. Keep this on while taking the photo so at least if your day bag is unattended, your most valuable items are close at hand.
Alternatively, hold your phone and wallet and walk into the scene holding them subtly in front of you.
Don’t go too far from your camera
This is common sense really. I would rather have a photo of me slightly closer to the camera than have my camera stolen by walking five minutes away. A tip for this is to zoom out as far as possible, then you can be relatively near to the camera but still have a lot of scenery included. You can always crop it or zoom in later.
Best time of day for taking photos of yourself
There are so many photos out there of me blinded and squinting in the middle of the day, my face in shadow from the sun. If you want great solo travel photos and can control the time you visit a place, I would advise putting some thought into this. These are the best times of day for travel photos:
Early morning: I hate getting up early but it’s worth it. Firstly, you’re more likely to have a place to yourself which means there are fewer safety concerns in terms of leaving your camera and secondly, fewer people getting in your shot.
In terms of lighting, it’s best because the sun is low in the sky so you don’t get those hard shadows across your face. Also, it’s cooler and you’ll be less sweaty and stressed in your photos.
Evening golden hour: Everyone looks great. Enough said. Also called the magic hour, this doesn’t take place at a specific ‘hour’ because sunset times change around the world and by season. Golden hour is the period shortly before sunset when the sun is low in the sky and everything looks pleasantly golden.
In terms of travel locations, people may be heading home by this time so there’s more chance of having it to yourself. Other photographers may be the only ones remaining and even help you out!
Thanks for reading!
More solo guides:
- Solo female travel in Lisbon, Portugal
- Solo travel in Croatia
- Where to travel alone in Italy
- Solo female travel in South Africa – safety tips & more
- Best destinations in India for solo travel
- Tips for travelling alone in India
- Solo travel in Europe
- Solo travel destinations in Southeast Asia
- Female travel guide to Cuba
Follow me for more solo travel content on Instagram, Facebook, Twitter and YouTube.
I hope you have a better idea of how to take photos of yourself. It’s daunting at first but I promise it becomes easy!
Check out my other solo travel blogs:
- 10 myths about solo female travel, debunked!
- What’s best, group travel or solo travel?
- Is technology ruining travel?
- Benefits of travelling alone
- Why coming home is the hardest part of any trip
Americas solo travel guides:
- New York solo travel guide
- Solo female Mexico travel
- Guide to solo female travel in Mexico City
- Is solo travel in Guatemala safe?
- Travelling alone in Cuba
Asia solo travel guides:
- Solo female travel in Bali
- Solo travel in Thailand
- Solo travel in Taiwan
- Guide to solo travel in Malaysia
- Solo female Vietnam travel
- Solo travel in India
- Where to travel alone in India
Europe solo travel guides:
- Solo travel in Croatia
- Is Albania safe for solo female travel?
- Portugal solo female travel guide
- Solo female travel in Lisbon
- Is solo Romania travel safe?
See you next time for more adventures,
Rose
Ps. Liked these solo travel photography tips? Pin this for later!

I loved reading this! I always struggle to take photos when I’m alone, these tips are so helpful!
I love this blog! Solo traveling can be scary, but Rose help me a lot with this ❤️❤️
Hi Tatuajera, I am so pleased to hear this and I wish you the best of luck on your trip!
I’ve just started traveling solo, and loved to read your article. It’s been just selfies for me right now, but most of them don’t turn out too well, haha. I got a tripod/stick that fits in my pocket, but I haven’t even used it yet because it’s kind of a hassle to put my phone in it. Do you have Instagram? Check me out if you want, my Instagram is @Mennohhh. I’m sharing my travel pictures on there!
My best tip for the self timer problem on the phone is to take a video of yourself. Than you won’t just have one good picture. You will have as much as you like. Sometimes the outcome of my screenshots of the video will be a pose or just a short moment that is utterly beautiful and without the video I wouldn’t have catchend it!
That’s such a good tip!
I’m travelling for 4 months in the UK and your blog has been super helpful! I just regret not finding your articles before I left. I’ve been very nervous about leaving my camera unattended on my tripod, but your reassurances in this article may have pushed me to try for the perfect shot in the highlands this week. Thanks for sharing such a realistic experience of solo female travel 🙂 much better than my mom complaining every time I leave my accommodation!
Hey Danni! Glad it’s helped! And yes we gotta take risks sometimes for that shot 😉 hope you have a fab trip x
Loved reading this, thanks for these helpful article. Will have my first soll trip in 2 weeks (Denmark), excited to try these tips out.
Hi Natalie, glad they helped and i hope you enjoy Denmark! Let me know how you get on with the photo tips!
I’m one of those people who stops and let someone finish taking their photos before passing by them. I mean maybe your timer is down to a few seconds. I don’t wanna leave a blurry image there. 😂
Haha – you are very thoughtful!